Leaks FAQs
We've been building faucets for nearly half a century. And in that time, we've solved plenty of riddles for homeowners and pros alike. We've gathered some of our most-asked questions to life a little easier for you.
Leaks
After turning off my pull-out spray faucet, water continues to drip for a minute or so. Is something wrong?
Nothing is wrong with your faucet. Water is simply emptying from the aerator and the hose of your faucet. The top of the arch of your spout is above the aerator, so water runs down the arch and out. The hose also expands slightly when the water is running. When the water is shut off, the hose contracts to its original size squeezing out the water.
If your drip continues for more than a minute or so, then you may have debris in your valve or need to replace the cartridge or seats inside the valve.
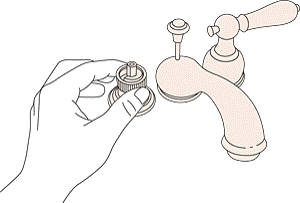
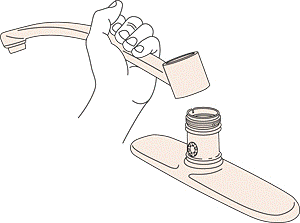
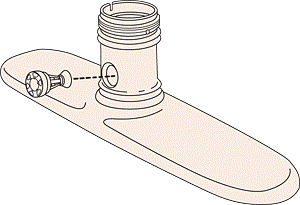
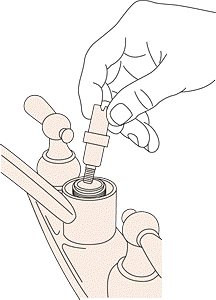
What do I do if my two-handle faucet leaks under the handle?
Here are some tools you may need: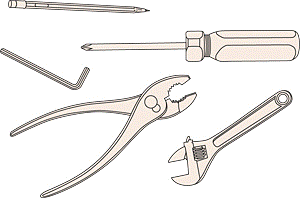
On a two-handle faucet, try tightening the bonnet shown below.
If that does not work, you may need to replace the stem.
To identify the appropriate handle stem, search for the model number on peerless.com and refer to the parts diagram provided on the product page.
To replace the stem:
- Shut off the water supply.
- Cover drain opening so parts won’t fall into it.
- If you have lever handles, loosen the set screw with an Allen wrench. 3/32" is the most common size. And then remove the handle.
If you have knob handles, carefully pry off the handle button. Then remove the screw using a Phillips screwdriver and lift off the handle. - Unscrew bonnet nut. Use an adjustable wrench to loosen if necessary.
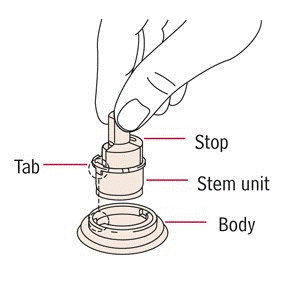
- Note the orientation of the stem unit. Pull stem straight up and out.

- IMPORTANT—STEM MUST BE REPLACED PROPERLY.
- Knob handle stem position: Slip the stem unit into the body, aligning the tabs on the stem with the slots in the body, so the “stop” on each stem points toward the spout.
- Lever handle stem position: Align the tabs on the stem with the slots in the body, so the “stop” on each stem points toward the right. If you have lever handles, you may also need to reinstall the quarter turn stops to limit the handles from turning more than 90º. Note: If you reinstall the handles and find that they aren’t turning in the correct direction, rotate the stem 180º and check for proper handle rotation.
- Screw bonnet nut on and hand tighten.
- Replace handle, tighten the screw.
My faucet leaks. Should I take it back to the dealer?
In most cases, a faucet leak can be repaired with Peerless® Genuine Parts. If you still have your installation instructions for the faucet, check the troubleshooting section for repair information.
If you don’t have your installation instructions anymore, please visit the Online Catalog to search for your faucet’s maintenance & installation instructions. Once you find your faucet, select Maintenance & Installation for repair information.
If these options don't work, call 1-800-438-6673 or e-mail us for assistance.
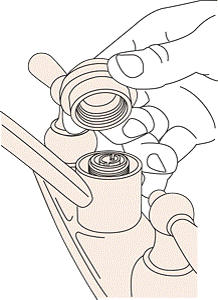
My pressure balance valve isn't working properly. What can I do?
Tips for maintaining a pressure balance valve.
The spool and sleeve, the part of the Monitor pressure balance valve that blends the hot and cold water, may not be working properly. This is often caused by mineral deposits that build up over time. To solve, follow the steps below.
Tools you may need: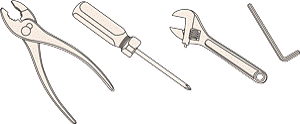
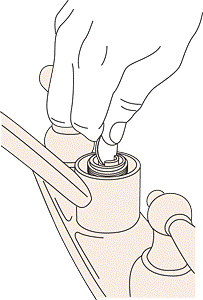
- Shut off the water supply.
- Remove handle.
- Twist and pull sleeve to remove it.
- Unscrew the brass bonnet nut.
- Remove cartridge.
- Soak the cartridge in a 50/50 vinegar and water solution for 24 hours to remove any mineral deposits.
NOTE: Unless both hot and cold water supplies are turned on, the pressure balance valve will allow only a dribble of water to flow through the valve.
Helpful Hints:
- Before removing valve cartridge assembly for any maintenance, be sure to note the position of the stop on the cap. The valve cartridge assembly must always be put back in the same position. For normal installations, the stop on the cap will face the left.
BE SAFE! After you have finished the installation, turn on valve to make sure COLD WATER FLOWS FIRST.
- To remove valve cartridge from body, shut off water supplies and remove handle and bonnet nut. Do not pry the valve cartridge out of the body with a screwdriver. Place handle on stem and rotate counterclockwise approximately 1/4 turn after the stop has been contacted. Lift valve cartridge out of body
- To remove seats and springs, remove valve cartridge. Separate cap assembly from the housing assembly by rotating the cap assembly counterclockwise 90 degrees. Separate cap and housing assemblies. Remove seats and springs and replace. Place the largest diameter of the spring into the seat pocket first and then press the tapered end of the seal over the spring. Reassemble valve cartridge and replace in body following instructions given in 1 above.
- If the water in your area has lime, rust, sand or other contaminants in it, your pressure balance valve will require periodic inspection. The frequency of the inspection will depend on the amount of contaminants in the water. To inspect valve cartridge remove it and follow the steps in note 1 above. Turn the valve to the full mix position and shake the cartridge vigorously. If there is a rattling sound, the unit is functional and can be reinstalled following instructions given in note 1 above. If there is no rattle, replace the cartridge.
What do I do about water dripping from the spout of my two-handle kitchen or lavatory faucet?
One of the more common faucet valve systems uses a stem unit assembly with seats & springs. With normal wear, the faucet’s seats and springs become worn, which may result in a leak from the spout. To stop the leak, simply replace the seats and springs by following these steps. If there is a single component cartridge and no seat & spring in the valve body, just replace the cartridge.
Here are some tools you may need:
If you are not certain, you will need to find out if the hot or cold valve is causing the leak. Let's begin by troubleshooting with the hot valve:
- Shut off the water supply.
- Cover the drain opening so parts won’t fall into it.
- If you have lever handles, loosen the set screw with a hex wrench and remove the handle. If you have knob handles, pry off the handle button, remove the screw, and lift off the handle.
- Unscrew the bonnet nut. Use an adjustable wrench to loosen if necessary.

- Take note of the stems and the raised portions around it so you can put them back in the same arrangement. Pull the stem straight up and out.

- Remove the seat and spring. You can lift them out with a thin screwdriver or a hex wrench. If you do not see a donut shaped seat and metal spring in the valve body, then only the stem cartridge needs replaced.
- Wipe the inside of the body, including where the seat and spring sit, with a soft, lint-free cloth.
- Place the new seat over the new spring and insert them into the socket in the body using a thin tool or a hex wrench. (Small end of the spring goes into the seat; the large end of the spring goes into the faucet body.)

- IMPORTANT—STEM MUST BE REPLACED PROPERLY.
- Knob handle stem position: Slip the stem unit into the body, aligning the tabs on the stem with the slots in the body, so the “stop” on each stem points toward the spout.
- Lever handle stem position: Align the tabs on the stem with the slots in the body, so the “stop” on each stem points toward the right. If you have lever handles, you may also need to reinstall the quarter turn stops to limit the handles from turning more than 90º. Note: If you reinstall the handles and find that they aren’t turning the right direction, rotate the stem 180º and check for proper handle rotation.

- Screw the bonnet nut back on, tightening it by hand.
- Replace the handle and tighten its screw.
Repeat the above steps on the cold valve. If the problem continues after you replace the seats and springs, replace both stem assemblies.
What do I do about water dripping from the spout of my two-handle (or three-handle) tub/shower faucet?
First, we need to find out whether it’s the hot or cold valve causing the constant leak. Let's begin by troubleshooting with the hot valve:
- Shut off the hot water supply. If you can't find the shut-off for your tub/shower valve, shut off the water to your house by using your water shut-off valve.
- Remove the faucet handle. Depending on your handle type, you will need a Phillips screwdriver or an Allen wrench to do this.
- Remove the chrome bonnet nut using an adjustable wrench.
- Remove the stem extender by unscrewing the retention screw with a Phillips screwdriver.
- Remove the stem assembly by pulling straight out.
- Remove the seats and springs inside the valve body.
- Examine them for wear or debris and wipe out any debris in the depression where the seats and springs sit in the valve body.
- Replace the seats and springs.
- Reassemble the faucet and confirm drip has stopped.
If the drip persists, repeat the above steps on the cold valve.
If you've replaced the seats and springs and the problem continues, replace both stem assemblies.
If all of the above has not fixed your leak, and your valve is more than about 25 years old, it is possible that the actual faucet body may have developed a leak. If so, you will need to replace your tub/shower valve with a new one.
Note: Consumer safety is our number one concern. If you do not have experience with plumbing repairs, we recommend that you contact a licensed plumber for tub/shower repairs.
What do I do about water flowing from my diverter tub spout while it is in the shower mode?
It is normal for a small (pencil thin) stream of water to continue to flow from the tub spout when the shower is in operation.
If the amount of water flow is excessive, then this indicates a problem with the diverter located in the tub spout. This cannot be repaired, and the spout must be replaced. Remove the tub spout and replace it with a Genuine Peerless tub spout.
To locate a local source for Peerless tub spouts, contact a licensed professional plumbing contractor, or call 1-800-438-6673, or just e-mail us for assistance.
Note: Consumer safety is our number one concern. If you do not have experience with plumbing repairs, we recommend that you contact a licensed plumber for tub/shower repairs.
What do I do if my single handle faucet leaks under the handle?
On a single handle faucet, you need to tighten the adjusting ring or replace the cam and packing.
- Tighten the adjusting ring until no water leaks around the stem when the faucet is in the full-on hot and cold mixed position, and pressure is exerted down on the handle.

- Loosening and tightening the adjusting ring also controls how hard or easy the handle is to use. Over-tightening the adjusting ring can cause premature wear of the seal surfaces, making frequent repairs necessary.
If there’s still a leak after you’ve tightened the adjusting ring, you may need to replace the cam and packing using Peerless Genuine Parts. And here’s how you do that:
- Shut off the water supply.
- Cover the drain opening with a towel so parts can’t fall down the drain.
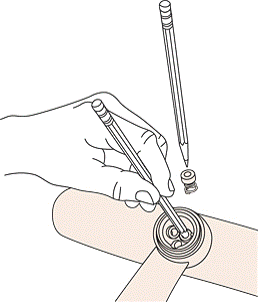
- If you have a lever handle with a red and blue hot/cold button, pry it off to expose the set screw. Loosen the set screw with an Allen wrench and remove the handle. If you have a knob handle, pry off the handle button, remove the screw and lift off the handle.
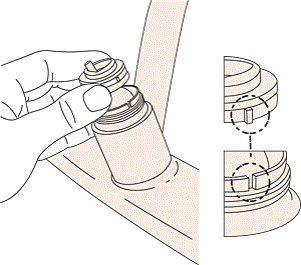
- Unscrew the cap (counterclockwise) and lift it off. If the cap is too difficult to unscrew by hand, loosen the gray or white adjusting ring in the cap and try again. If you still can’t remove it by hand, place a crescent wrench at the top of it and turn counterclockwise. To avoid damaging the faucet finish, you may want to place a jar opener gripper between the cap and wrench, or a heavy cloth (such as a towel) between the cap and wrench. CAUTION: IF YOU NOTICE THE CAM TURNING ALSO, QUIT TURNING IMMEDIATELY AND CALL A PLUMBER.
- Remove the cam, packing and ball by lifting up on the ball stem.
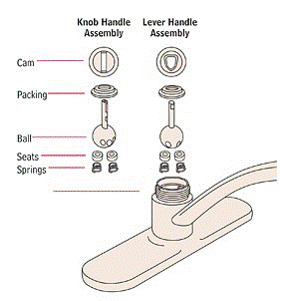
- Place the replacement packing and cam over the stem of the ball and engage the tab on the cam with the slot in the body. (The peak of the triangle in the cam for a lever handle faucet will be facing the spout.) Now push down.

- Partially unscrew the adjusting ring, then place the cap over the ball stem and hand-tighten it onto the body, while pushing down on the cam to keep its tab engaged with the slot in the body.
- Tighten the adjusting ring until no water leaks around the stem when the faucet is in the full-on hot and cold mixed position, and pressure is exerted down on the handle.
What do I do if my single lever tub or shower leaks under the handle?
On a single-handle tub or shower, you need to tighten the adjusting ring or replace the cam and packing.
- Tighten the adjusting ring until no water leaks around the stem when the faucet is in the full-on hot and cold mixed position and pressure is exerted down on the handle.
- Loosening and tightening the adjusting ring also controls how hard or easy the handle is to use. Over tightening the adjusting ring can cause premature wear of the seal surfaces, necessitating frequent repairs.
If the leak persists, you may need to replace the cam and packing using Peerless Genuine Parts.
- Shut off water supply.
- Cover drain opening so parts don't fall into it.
- If you have a lever handle with a red and blue hot/cold button, pry it off to expose the set screw. Loosen the set screw with an Allen wrench and remove the handle. If you have a knob handle, pry off the handle button, remove the screw and lift off the handle.
- Unscrew the cap counterclockwise and lift off. If the cap is too difficult to unscrew by hand, loosen the gray or white adjusting ring in the cap and try again. If it is still too difficult to remove by hand, place a crescent wrench at the top of it and turn counterclockwise. To avoid damaging the faucet finish, you may want to place a jar opener gripper between the cap and wrench or a heavy cloth such as a towel between the cap and wrench.
CAUTION: IF YOU NOTICE THE CAM TURNING ALSO, QUIT TURNING IMMEDIATELY AND CALL A PLUMBER. - Remove cam, packing and ball by lifting up on ball stem.
- Place replacement packing and cam over stem of ball and engage tab on cam with slot in body. Push down.
- Partially unscrew adjusting ring and then place cap over ball stem and hand tighten onto body, while pushing down on cam to keep cam's tab engaged with slot in body.
- Tighten the adjusting ring until no water leaks around the stem when the faucet is in the full-on hot and cold mixed position and pressure is exerted down on the handle.
- Loosening and tightening the adjusting ring also controls how hard or easy the handle is to use. Over tightening the adjusting ring can cause premature wear of the seal surfaces necessitating frequent repairs.
What do I do if my single-handle kitchen faucet drips from the spout outlet or aerator?
Through normal use, and depending on the water conditions in your area, the seats and springs experience wear and may need to be replaced occasionally. It is also possible that there is sediment or debris in your faucet. If your faucet drips from the spout, follow these simple steps:
First attempt to flush the debris from the system:
- Remove the aerator.
- Turn off the water supplies.
- Turn the faucet handle to the "on" position.
- Turn the water on at the supply.
- Flush the faucet and supply lines for one minute.
- Wash any debris from the aerator before you replace it.
- Turn off the water using the faucet handle.
Next, check the seats and springs and the ball valve. You may need to replace those using Peerless Genuine Parts.
- Shut off water supply.
- Cover the drain opening so parts don't fall into it.
- If you have a lever handle with a red and blue hot/cold button, pry it off to expose the set screw. Loosen the set screw with a hex key (usually 1/8") and remove the handle. If you have a knob handle, pry off the handle button, remove the screw with a Phillips screwdriver, and lift off the handle.
- Unscrew the cap counterclockwise and lift off. If the cap is too difficult to unscrew by hand, loosen the gray or white adjusting ring in the cap and try again. If it is still too difficult to remove by hand, place an adjustable wrench at the top and turn it counterclockwise. To avoid damaging the faucet finish, you may want to place a jar opener gripper between the cap and wrench or a heavy cloth such as a towel between the cap and wrench. CAUTION: IF YOU NOTICE THE CAM TURNING ALSO, QUIT TURNING IMMEDIATELY AND CALL A PLUMBER.
- Remove cam, packing and ball by lifting up on ball stem.
- Remove seats and springs. You can lift them out with a pencil or an Allen wrench.
- Wipe the inside of the body with a soft cloth, including where the seats and springs sit.
- Place new seats over new springs and insert them into sockets in the body using a pencil or an Allen wrench. (Small end of the spring goes into the seat and the large end of the spring goes into the faucet body.)
- If a stainless steel ball is already installed, check it for damage or mineral deposits. Clean it by soaking it in vinegar and wiping it with a rough towel. If the ball appears to be scratched or damaged, you may also need to replace the ball. Place ball into body.
- Place packing and cam over the stem of the ball and engage the tab on the cam with the slot in the body. (The peak of the triangle in the cam for a lever handle faucet will be facing the spout.) Push down.

- Partially unscrew the adjusting ring and then place the cap over the ball stem and hand tighten onto the body, while pushing down on the cam to keep the cam's tab engaged with the slot in the body. (Note: If the cam and packing is the single piece self-adjusting design and the faucet has the adjusting ring installed at the top of the bonnet nut/cap it should be removed prior to reinstalling the bonnet nut/cap and discarded. Leaving it installed can damage the cam and cause the faucet to leak from the handle.
- Tighten the adjusting ring until no water leaks around the stem when the faucet is in the full on hot and cold mixed position and pressure is exerted down on the handle.
Loosening and tightening the adjusting ring also controls how hard or easy the handle is to use. Over-tightening of the adjusting ring can cause premature wear of the seal surfaces necessitating frequent repairs.
If the leak persists, check the faucet's stainless steel liners. Replace the entire faucet if the liners are missing, damaged or sticking up above the brass valve body.
What do I do if water leaks from my kitchen spout while my vegetable spray is in use?
The problem may be a blocked or damaged diverter assembly. Follow these steps to solve:
To access the diverter -- Single-handle faucet:
- Shut off water supply under the sink.
- Cover drain opening so parts won’t fall into it.
- Remove the handle, cap, cam, packing and ball assembly.
- Gently rotate and lift off the spout.
- Remove the diverter assembly. Be sure to remove the entire diverter.
- Insert a flat head screwdriver or an Allen wrench into the body cavity to pop out the diverter. Check for debris on the diverter, as well as in the diverter cavity in the faucet body. A flashlight will help when looking to the back of the cavity.
- Clean the diverter thoroughly by soaking in a 50/50 vinegar and water solution for two hours; reinstall. If diverter appears damaged, replace it with Peerless® Genuine Part.
To access the diverter -- Two-handle faucet:
- Shut off water supply under the sink.
- Cover drain opening so parts won’t fall into it.
- Unscrew and remove the spout nut. Use a crescent wrench to loosen if necessary.
- Unscrew the diverter from the top of the body using a coin (if the diverter is plastic) or a screwdriver (if the diverter is metal). Be sure to remove the entire diverter.
- Clean the diverter by soaking in a 50/50 vinegar and water solution for 2 hours. Flush any debris from the opening.
- Replace the diverter and spout nut.
Check to see if the diverter functions properly. If not, replace it with a Peerless diverter. Be sure that the old diverter seal is removed before install the new diverter. The old diverter seal can prevent the new diverter from operating properly.
Be careful not to over tighten the diverter.
NOTE: Old style metal and current-style plastic diverters are interchangeable.
What should I do if water is leaking behind the wall of my tub/shower valve?
Shut off the water supplies to your tub/shower valve. If you can’t find those, shut off all the water to your house using your main shut-off valve. Then call a licensed professional plumbing contractor for assistance.
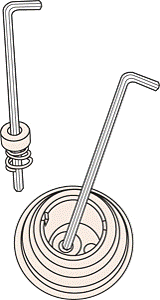
Why doesn't my pop-up sink stopper stop the water from draining?
Look under the sink to be sure the strap assembly that operates the stopper is properly adjusted and that the nut holding the horizontal rod in the drain assembly is secure. Be sure the stopper is properly adjusted.
Note: The cap on the stopper is not designed to be flush with the flange. A seal is created by the weight of the water, which pushes the rubber seal under the stopper against the flange in the sink.
If your drain stopper has been installed to be non-removable, check to see if any section of the pivot rod or strap assembly hits underneath the counter or sink. If so, the stopper can't drop far enough to create a seal in the sink. Depending on what is blocking the action of the pivot rod or strap, you may be able to rotate the pop-up sink stopper slightly so it no longer bumps against anything under the sink.
If everything is adjusted properly, check the amount of silicone or putty between the flange and the sink itself. Although a white gasket is supplied with most drains to seal under the flange, if a sink has an unusually rough drain area surface, it may be necessary to use silicone instead of the gasket. It is possible to determine if there is insufficient silicone or putty under the flange by using a rubber stopper to seal the drain opening only. You can also press down on the stopper to attempt a manual seal and determine if water is leaking around the pop-up flange. If there is insufficient silicone or putty between the sink and the pop-up flange, water will leak out of the sink into the drain, even with the drain stopper fully closed.
Note: Water will not leak onto the cabinet floor; it will seep into the drain via the overflow holes in the drain body.
To check the flange's seal:
Remove the nut that holds the horizontal rod to the body of the drain pipe.
- Remove the horizontal rod.
- Lift the stopper out.
- Reattach the nut that holds the horizontal rod to the pop-up body.
- Test to see if water is leaking around the flange by plugging your drain with a rubber stopper. Do not cover the outside of the drain flange.
- If the leak continues, remove the flange and apply more silicone or putty under the flange.
To remove the flange:
- Unscrew the large nut under the sink.
- Unscrew the drain body from the flange. Some plastic bodies do not need to be separated from the flange.
- Pull the flange straight up through the sink. If the flange sticks to the sink, gently pry it loose.
- Apply a fresh, uniform-round bead of silicone or putty.
- Reinstall the flange and tighten the nut under the sink.
Note: Do not rotate the flange or drain body after re-installation. Rotation may cause the silicone or putty seal to break, which may cause leakage.
Caution: Before using plumber's putty, be sure to read the warning labels to make sure it won't stain marble or attack plastic sinks or rubber components.